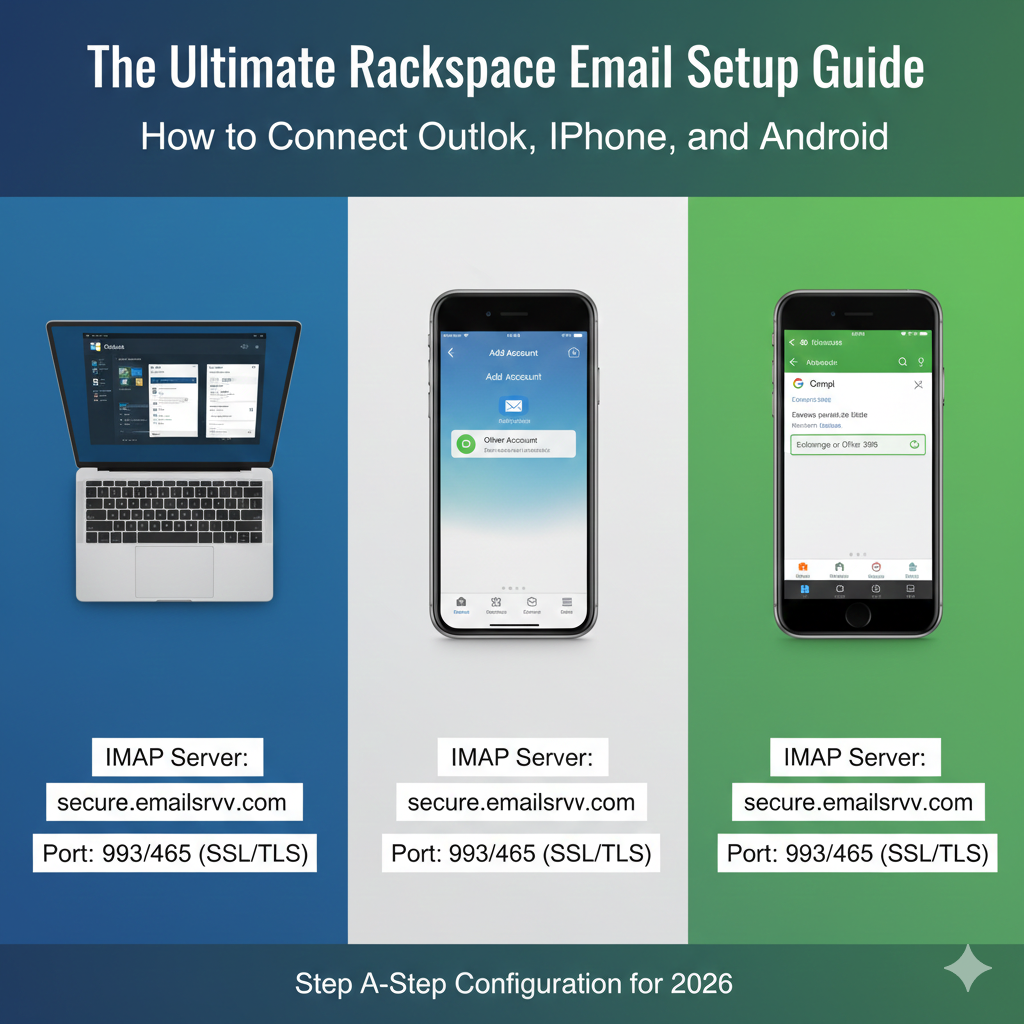
The Ultimate Rackspace Email Setup Guide: How to Connect Outlook, iPhone, and Android.
Reliable communication acts as the nervous system of any successful company. When your emails stop flowing, business effectively stops. While giants like Google and Microsoft dominate the productivity suite market, Rackspace remains a heavyweight champion for businesses that want reliable, no-frills, budget-friendly email hosting.
However, saving money on your monthly hosting bill often means taking a slightly more hands-on approach to configuration. Unlike the automated “one-click” setups of integrated ecosystems, getting your Rackspace email running smoothly across your laptop, smartphone, and tablet requires entering specific server details.
If you have chosen Rackspace for its robustness and cost-effectiveness, you need to ensure it is configured correctly to prevent missed connections or syncing errors. This guide acts as your technical manual. We will walk you through the exact steps to set up Rackspace email on Outlook, iPhone, and Android, and troubleshoot the most common issues users face during installation.
What You Need Before Setting Up Rackspace Email
Before diving into the settings menus on your phone or computer, you need to gather a few essential pieces of information. Trying to guess these details during the setup process is the fastest way to get your IP temporarily blocked or your account locked.
Ensure you have the following three items ready:
1. Correct Login Credentials
This sounds obvious, but it is the most common hurdle. You need the full email address (e.g., name@yourdomain.com) and the current password. If you are an administrator, you can manage the Rackspace email login details from the Cloud Office Control Panel. If you are an employee, ensure your IT department has provided you with the temporary or permanent password.
2. Domain Configuration
For your email to work, your domain’s DNS records (specifically MX records) must already be pointing to Rackspace. If you just purchased the domain five minutes ago, you might need to wait for propagation.
3. A Stable Internet Connection
The initial handshake between your device and the Rackspace servers requires a stable connection to verify SSL certificates and credentials. Do not try to do this on spotty airport Wi-Fi if you can avoid it.
Once you have your credentials and Rackspace email settings handy, you are ready to configure the servers.
Rackspace Email Server Settings (IMAP / SMTP)
Regardless of which device you are using, the underlying architecture remains the same. Most modern email clients will try to “guess” the settings, but auto-discovery often fails or defaults to unencrypted ports.
For a secure and reliable connection, we recommend using IMAP (Internet Message Access Protocol) rather than POP. IMAP syncs email across all devices, whereas POP downloads it to one device and often deletes it from the server.
Here are the specific Rackspace IMAP settings and Rackspace SMTP settings you will need to enter manually:
Incoming Mail Server (IMAP)
- Server Hostname: secure.emailsrvr.com
- Port: 993
- SSL/TLS: Yes (Required)
Outgoing Mail Server (SMTP)
- Server Hostname: secure.emailsrvr.com
- Port: 465 (Recommended) or 587
- SSL/TLS: Yes (Required)
- Authentication: Password (Use the same login details as incoming mail)
Note: If your email client asks for a “POP” setting instead, the server is still secure.emailsrvr.com, but the port is 995 with SSL. However, stick to IMAP for the best multi-device experience.
How to Set Up Rackspace Email in Microsoft Outlook
Microsoft Outlook remains the gold standard for business communication. Whether you are using the classic desktop version or the newer integrated apps, the goal is to set up Rackspace email in Outlook so that it sends and receives without lag.
For Windows Outlook (Classic & New)
- Open Outlook: If this is your first time, you’ll be prompted to add an account. If not, go to File > Add Account.
- Enter Email Address: Type your full Rackspace email address. Click “Connect”.
- Advanced Options: If you see a checkbox for “Let me set up my account manually,” check it. If the auto-setup fails, this is your backup.
- Select IMAP: Choose the IMAP icon from the list of account types.
- Enter Server Details:
- Incoming mail server: secure.emailsrvr.com (Port 993, Encryption method: SSL/TLS)
- Outgoing mail server: secure.emailsrvr.com (Port 465, Encryption method: SSL/TLS)
- Password: Enter your email password and click Connect.
- Finalize: Outlook will test the connection. If successful, you will see a confirmation screen.
For Outlook on Mac
The Rackspace Outlook configuration on Mac is similar but the interface differs slightly.
- Open Outlook for Mac.
- Go to Tools > Accounts or click on the Outlook menu > Settings > Accounts.
- Click the plus (+) sign or “New Account”.
- Type your email address and click “Continue”.
- Outlook may try to sync with Microsoft Cloud. If given the option, choose “IMAP” or “Not Exchange”.
- Input the
secure.emailsrvr.comhostname for both incoming and outgoing servers. - Ensure the “Use SSL to connect” box is checked for both.
If you encounter issues where folders aren’t showing up, right-click on your inbox in the sidebar, select “IMAP Folders,” and ensure you are subscribed to all necessary directories.
How to Set Up Rackspace Email on iPhone (iOS Mail App)
Mobile access is non-negotiable for modern work. The iOS Mail app is robust, but it can be picky about SSL certificates. Follow these steps for a smooth Rackspace email iPhone setup.
- Open Settings: Navigate to your iPhone’s home screen and tap Settings.
- Find Mail Settings: Scroll down and tap on Mail. (In older iOS versions, this might be “Passwords & Accounts”).
- Add Account: Tap Accounts, then select Add Account.
- Select “Other”: Rackspace is not listed by default like Google or Yahoo. Tap Other at the bottom of the list.
- Add Mail Account: Tap Add Mail Account at the top.
- Enter Basic Info:
- Name: Your display name (e.g., John Doe).
- Email: Your full email address.
- Password: Your password.
- Description: A label for you (e.g., Work Email).
- Enter Server Details:
- Ensure the IMAP tab is highlighted at the top.
- Host Name (Incoming & Outgoing): secure.emailsrvr.com
- User Name: Your full email address (This is crucial—do not just use the part before the @ symbol).
- Password: Your email password.
- Verify and Save: Tap Next. The iPhone will verify the settings. If you get a “Cannot Verify Server Identity” error, check your spelling of “secure.emailsrvr.com” carefully.
- Select Services: Ensure “Mail” is toggled on. You can also toggle “Notes” if you want to sync notes to the server. Tap Save.
You have successfully managed to add Rackspace email to iPhone. Allow a few minutes for your inbox to populate.
How to Set Up Rackspace Email on Android
Android ecosystems are diverse, but the Gmail app is the standard controller for most email accounts. Here is how to handle the Rackspace email Android setup.
- Open Gmail App: Tap your profile picture in the top right corner.
- Add Another Account: Select Add another account.
- Select “Other”: Do not select “Outlook, Hotmail, and Live” or “Exchange” unless you have a specific Hosted Exchange plan. For standard email, select Other.
- Enter Email: Type your address and tap Next.
- Select Personal (IMAP): You will be asked what type of account this is. Choose Personal (IMAP).
- Password: Enter your password.
- Incoming Server Settings:
- Change the server from the default (often just your domain) to
secure.emailsrvr.com. - Tap Next.
- Change the server from the default (often just your domain) to
- Outgoing Server Settings:
- Again, ensure the server is
secure.emailsrvr.com. - Tap Next.
- Again, ensure the server is
- Account Options: Configure your sync frequency (e.g., every 15 minutes or Automatic).
- Finalize: Enter the name you want displayed on outgoing emails to add Rackspace email to Android successfully.
How to Set Up Rackspace Webmail Access
Sometimes, you don’t have your laptop or phone. You might be at a hotel business center or borrowing a colleague’s computer. This is where webmail shines.
Rackspace webmail login does not require complex server configuration; it just requires a browser.
- Navigate to the URL: Open any secure browser (Chrome, Firefox, Edge, Safari) and go to
apps.rackspace.com. - Enter Credentials: Type your email address and password.
- Login: Click “Log In.”
Rackspace email webmail is a powerful tool because it gives you a direct view of what is actually on the server. If your phone isn’t syncing, check webmail. If the email is in webmail but not on your phone, the issue is your phone settings. If the email isn’t in webmail, it was never delivered.
Security Tip: Always ensure you are on a private browsing window (Incognito mode) if you are accessing webmail from a public computer, and remember to log out completely when finished.
Sync Settings for Calendar and Contacts (If Applicable)
One limitation of standard IMAP email is that it strictly syncs email. It does not natively sync your calendar events or contacts between Outlook and your mobile device in the same way Exchange or Google Workspace does.
If you are on a standard Rackspace Email plan (not Hosted Exchange), your calendar and contacts in Outlook are stored locally on that computer.
- Workarounds: You may need third-party tools or separate protocols (like CalDAV or CardDAV) to sync contacts.
- Recommendation: If real-time calendar syncing across devices is vital for your business, consider upgrading your Rackspace plan to Hosted Exchange or Office 365.
Common Rackspace Email Setup Problems & Fixes
Even with detailed instructions, technology can be temperamental. Here are the most common reasons for Rackspace email not working and how to solve them.
1. “Cannot Verify Server Identity”
This usually happens on iOS. It means the device cannot confirm that secure.emailsrvr.com is legitimate.
- Fix: Check for typos in the hostname. Ensure you didn’t type “server.emailsrvr.com” or “secure.emailserver.com”. The spelling is specific:
emailsrvr.
2. Connection Timed Out
If your device tries to connect indefinitely without success, your local network might be blocking the port.
- Fix: Try switching from Wi-Fi to mobile data. Some corporate or public firewalls block port 465 or 993.
3. Password Errors Despite Correct Password
If you are 100% sure your password is correct but the server rejects it.
- Fix: Your account might be locked due to too many failed attempts. Log in to the Rackspace webmail login page. If you can log in there, the password is valid. If you can’t, you need to reset it.
4. Sending Fails but Receiving Works
This is an SMTP issue.
- Fix: Go back to your settings and ensure “Authentication” is turned on for the outgoing server. The outgoing server needs your password just as much as the incoming server does to fix Rackspace email connection error.
Security Best Practices for Rackspace Email
Setting up the email is step one. Keeping it a secure business email is step two. Rackspace offers robust backend security, but user error is the biggest vulnerability.
Use Strong Passwords
Avoid simple passwords. Use a mix of alphanumeric characters and symbols. Because you enter these details into your devices once and save them, there is no excuse for using a weak password for convenience.
Enable Multi-Factor Authentication (MFA)
If your Rackspace plan supports it (specifically for the control panel or webmail access), enable 2FA. This ensures that even if someone scrapes your password, they cannot access your business communications without your mobile device.
Trust Your Spam Filter
Rackspace has aggressive spam filtering. Occasionally, legitimate emails end up in the “Junk” folder. Check it weekly via Webmail or IMAP to ensure you aren’t missing leads, but generally, trust the filter to keep malicious phishing links out of your primary inbox. These email security tips are vital for protecting your domain reputation.
How to Test Your Rackspace Email Setup
Don’t assume it works just because the “Save” button didn’t return an error. Perform a full send/receive loop.
- Send an email to an external address: Send a test message from your new Rackspace setup to a personal Gmail or Yahoo account.
- Reply to that email: From the personal account, reply to the Rackspace address.
- Verify on multiple devices: Check if the sent email appears in the “Sent” folder on both your computer and your phone. Check if the reply appears in the “Inbox” on both.
If the email appears everywhere, your IMAP sync is functioning correctly.
FAQ – Rackspace Email Setup
Q1: What are the Rackspace IMAP and SMTP settings?
The universal settings are:
- Incoming (IMAP): secure.emailsrvr.com (Port 993, SSL)
- Outgoing (SMTP): secure.emailsrvr.com (Port 465, SSL)
Q2: How do I set up Rackspace email in Outlook?
Go to File > Add Account > Manual Setup. Choose IMAP. Enter secure.emailsrvr.com for both servers, use your full email address as the username, and ensure SSL encryption is enabled for both ports.
Q3: Why is my Rackspace email not syncing on iPhone?
This is often due to a “Push” vs “Fetch” setting. Go to Settings > Mail > Accounts > Fetch New Data. Ensure your Rackspace account is set to “Fetch” (usually every 15 minutes) as standard IMAP does not always support instant “Push” notifications on iOS native mail.
Q4: Can I use Rackspace email on multiple devices?
Yes. By using the IMAP protocol configured in this guide, your email state (read/unread, deleted, sent items) will sync across your computer, tablet, and smartphone.
Q5: How do I reset my Rackspace email password?
If you are a user, you cannot reset it from the email client. You must contact your company administrator or use the User Control Panel (cp.rackspace.com/usercp) if your admin has enabled access for you.
Q6: Does Rackspace email support two-factor authentication?
Yes, Rackspace offers Multi-Factor Authentication (MFA) for the Cloud Office Control Panel and Webmail, adding an extra layer of security to your business communications.
Proper Configuration Means Reliability
Setting up a business email shouldn’t require an IT degree, but it does require precision. By following the steps above, you ensure that your Rackspace email is not just “working,” but optimized for security and synchronization across your entire digital life.
Whether you are configuring a sleek new iPhone or a reliable office desktop, the key lies in the server details: secure.emailsrvr.com. Memorize that, and you can connect from anywhere.
Bookmark this guide for your next device upgrade. If you are still encountering issues, check your internet connection or reach out to Rackspace support for account-specific diagnostics.