Checklist: Launching Your First Website
Launching your first website is a milestone moment. It marks the transition from having an idea to establishing a digital presence that the world can see. Whether you are starting a blog, launching a small business portfolio, or opening an e-commerce store, hitting that “publish” button is exhilarating. But let’s be honest—it can also be terrifying.
The fear of missing a critical step or breaking something technical is real. Many beginners get stuck in “analysis paralysis,” endlessly tweaking designs or second-guessing their platform choice. Others rush the process, only to realize later that they forgot to secure their site or make it visible to search engines.
That is exactly why you need a reliable roadmap. A comprehensive launch website checklist transforms a chaotic jumble of tasks into a linear, manageable process. It ensures you don’t overlook the unglamorous but essential details—like legal pages and mobile optimization—that make the difference between a professional site and an amateur project.
In this guide, we will walk you through every phase of the process, from the initial setup to post-launch maintenance. You will learn how to choose a domain name, navigate technical setups without a computer science degree, and optimize your site so it actually gets found. Let’s turn your website setup guide into reality.
Step 1 – Choose a Domain Name
Your domain name is your address on the internet. It is how users find you, and it plays a massive role in your brand identity. Think of google.com or amazon.com—these names are short, memorable, and define the brand.
When you are figuring out how to choose a domain name, simpler is almost always better. You want something that is easy to type and impossible to misspell. Avoid using hyphens or numbers, as these often confuse users when they hear the address spoken aloud. If possible, stick with a .com extension. While there are hundreds of new extensions like .photography or .agency, .com remains the gold standard for trust and credibility.
Before you get your heart set on a specific name, you need to check its availability. You can do this through any domain registrar. If your dream name is taken, try adding a relevant verb or noun (like get or shop) rather than intentionally misspelling the word.
Quick Tip: Once you find an available name you love, buy the domain name immediately. Domain names are sold on a first-come, first-served basis, and thousands are registered every day.
Step 2 – Buy Web Hosting
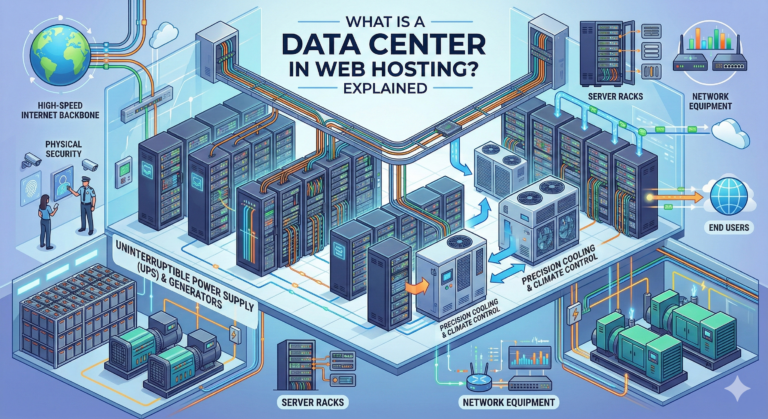
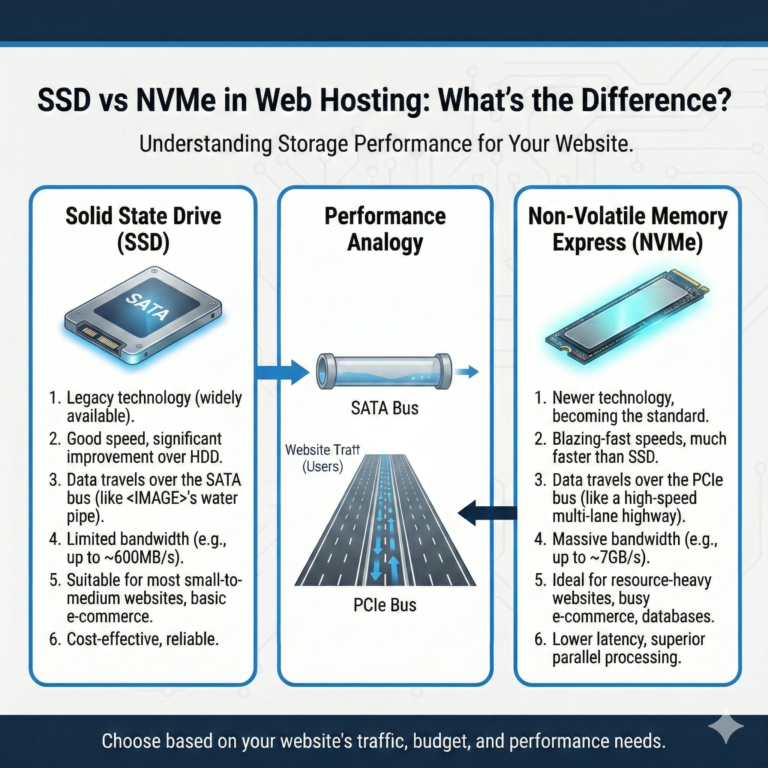
If your domain name is your home address, web hosting is the actual plot of land where your house sits. Web hosting services provide the server space where your website’s files, images, and content live.
For beginners, the sheer number of hosting types can be confusing. You will see terms like “Shared,” “VPS,” “Dedicated,” and “Cloud.” To keep things simple: Shared Hosting is usually the best web hosting for beginners. It is cost-effective because you share server resources with other websites, which is perfectly fine for a new site with lower traffic levels.
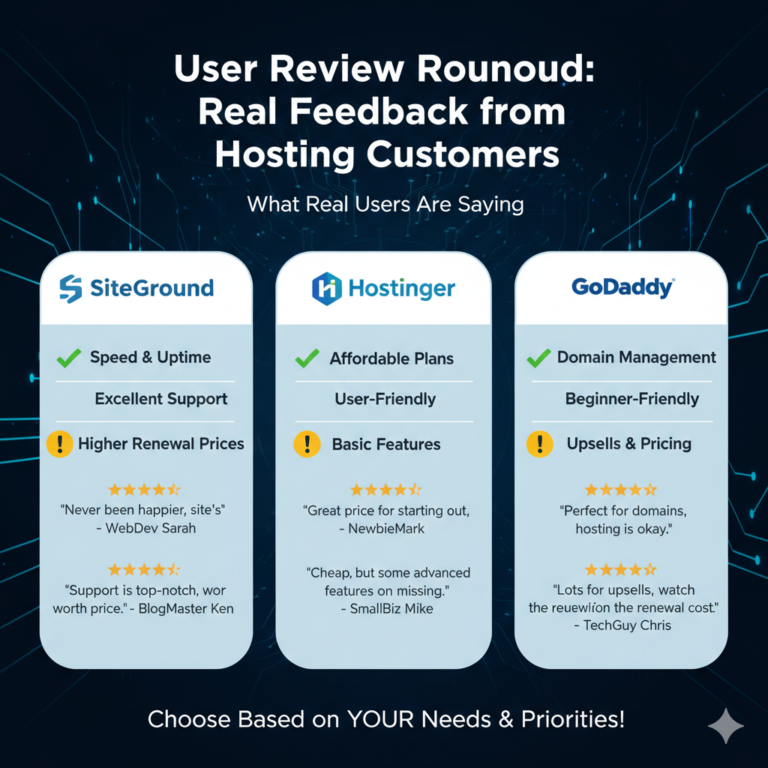
When you go to buy web hosting, look for providers known for reliability and customer support. You want a host that offers an uptime guarantee (usually 99.9%) and 24/7 support in case you break something at 2 AM. Many hosting companies also offer a free domain name for the first year when you sign up, which can save you a bit of startup cash.
Step 3 – Connect Domain to Hosting
If you purchased your domain name and hosting plan from the same provider (like Bluehost or GoDaddy), you can usually skip this step. Most providers will automatically connect domain to hosting for you during the checkout process.
However, if you bought your domain from a registrar (like Namecheap) and your hosting from a different company (like SiteGround), you need to introduce them to each other. This is done by updating the Domain Name System (DNS) settings.
Your hosting provider will give you two “Nameservers” that look something like ns1.hostingcompany.com and ns2.hostingcompany.com. You simply log into your domain registrar account, find the DNS management section, and replace the default nameservers with the ones provided by your host.
Note: When you update DNS settings, the changes can take anywhere from a few hours to 48 hours to take effect globally. This period is called “propagation.” Don’t panic if your site doesn’t load instantly!
Step 4 – Install WordPress or Website Builder
Now that you have your land (hosting) and address (domain), it’s time to build the house. You need a Content Management System (CMS) to build and manage your website without needing to write code from scratch.
For most people, the best route is to install WordPress. It powers over 40% of the web and offers unparalleled flexibility. Most beginner-friendly hosting providers offer a “One-Click Install” feature for WordPress in their control panel. You just fill in your site name, create an admin username and password, and click “Install.”
If you prefer a drag-and-drop experience where hosting and software are bundled together, you might opt for a website builder setup like Wix or Squarespace. While these platforms are easier to start with, they can be more expensive and less flexible than WordPress in the long run.
Step 5 – Choose a Website Theme and Design Layout
Your website’s design determines how visitors perceive your brand within the first few seconds of landing on your page. You don’t need to be a graphic designer to make a good impression; you just need a solid theme.
When browsing the repository for the best WordPress themes, prioritize “mobile responsiveness.” This means the theme automatically adjusts its layout to look good on phones, tablets, and desktops. With more than half of global web traffic coming from mobile devices, a non-responsive site is a dealbreaker.
Focus on website design for beginners that emphasizes User Experience (UX). Keep your navigation menu simple, use readable fonts, and ensure there is plenty of whitespace so your content doesn’t look cluttered. A clean, minimalist design often looks more professional than one packed with flashy animations.
Step 6 – Create Essential Pages
Content is king, but structure is the castle. Before you start blogging or listing products, you need to create website pages that serve as the foundation of your site.
Here is a checklist of website essential pages you should publish before launch:
- Home Page: This is your elevator pitch. Within seconds, a visitor should know who you are, what you do, and what they should do next (e.g., “Sign up,” “Read more,” “Buy now”).
- About Page: People buy from people. Use this page to share your story, your mission, and why visitors should trust you.
- Contact Page: Make it easy for people to reach you. Include a contact form, professional email address, and links to your social media profiles.
- Privacy Policy: If you collect data (like email addresses or analytics cookies), this is legally required in many jurisdictions. You can often generate a basic one using free online tools or plugins.
Step 7 – Install Essential Plugins and Tools
One of the biggest advantages of WordPress is the library of over 50,000 plugins. However, installing too many can slow down your site. Stick to the essentials.
Here are the best WordPress plugins for beginners that cover your bases:
- SEO: Yoast SEO or Rank Math. These tools guide you through optimizing your content so search engines can understand it.
- Security: Wordfence or Sucuri. These act as a firewall to keep hackers and malicious bots out.
- Backups: UpdraftPlus. This ensures you can restore your website if it breaks or gets hacked.
- Speed Optimization: WP Rocket or W3 Total Cache. These plugins help your pages load faster by caching static content.
These website optimization tools act as the plumbing and electrical wiring of your house—invisible to the guest, but vital for everything to work correctly.
Step 8 – Optimize Website for SEO
You can build the most beautiful website in the world, but it won’t matter if nobody sees it. Search Engine Optimization (SEO) is the process of improving your site to rank higher in Google search results.
Follow this mini SEO checklist for new website owners:
- Permalinks: Ensure your URL structure is clean. Instead of
yourdomain.com/?p=123, it should beyourdomain.com/my-first-post. - Meta Tags: Write a unique title and meta description for every page. This is the preview text users see in Google results.
- Headings: Use H1, H2, and H3 tags to structure your content. Google uses these to understand the hierarchy of your information.
- Image Alt Text: Describe your images using text so search engines (and visually impaired users) know what they depict.
When you optimize website for Google from day one, you save yourself the headache of fixing hundreds of pages later.
Step 9 – Secure Your Website
Security isn’t optional. In the modern web, users expect your site to be safe. The first step in your website security checklist is to install an SSL certificate. This changes your website prefix from http:// to https:// and adds a padlock icon to the browser bar. Most hosting providers include a free SSL (Let’s Encrypt) with their plans.
Beyond SSL, ensure your administrative username is not “admin” (which is the first thing hackers guess) and that you are using a strong, unique password. Configure your backup plugin to save a copy of your site to a remote location, like Google Drive or Dropbox, at least once a week.
Step 10 – Test Website Performance and Mobile Responsiveness
Before you announce your website to the world, you need to break it. Or at least, try to.
Go through a rigorous testing phase. Use tools like Google PageSpeed Insights or GTmetrix to test website speed. If your site takes more than 3 seconds to load, you risk losing visitors.
Next, perform a mobile friendly website test. Open your site on your phone, your partner’s phone, and a tablet. Click every link. Fill out your contact form to ensure the email actually arrives in your inbox. Check that your menu opens correctly and that no text is cut off on smaller screens. Fixing these bugs now prevents a poor first impression later.
Step 11 – Launch Your Website and Submit to Search Engines
The moment has arrived. It is time to disable the “Coming Soon” mode and go live! But simply publishing isn’t enough; you need to tell Google you exist.
The most effective way to do this is to submit website to Google via the Google Search Console. This is a free tool that allows you to monitor how Google views your site. You should submit your XML sitemap (which your SEO plugin will generate for you) to the Search Console. This acts as a map for Google’s bots, guiding them to all your pages so they can be indexed quickly.
This is the final item on your launch website checklist before you start marketing.
Step 12 – Post-Launch Monitoring and Maintenance
A website is never truly “finished.” It is a living entity that requires care. If you ignore it for months, it becomes vulnerable to security threats and performance issues.
Establish a website maintenance checklist routine:
- Weekly: Check for plugin and theme updates. Updates often contain security patches.
- Monthly: Review your analytics to see which pages are popular and where visitors are dropping off.
- Quarterly: Test your backup files to ensure they can actually be restored.
If you monitor website performance consistently, you can catch small issues before they become site-breaking disasters.
FAQ – Launching Your First Website
Q1: How much does it cost to launch a website?
The cost varies wildly depending on your needs. For a basic DIY site using WordPress, you might pay around $50–$150 per year for a domain and hosting. If you hire a developer or use premium themes and plugins, the cost can range from $500 to several thousand dollars.
Q2: How long does it take to launch a website?
If you follow a guide and use a template, you can technically launch a basic website in a single afternoon. However, creating high-quality content and refining the design usually takes 1–2 weeks for a beginner.
Q3: Do I need technical skills to build a website?
No. Modern tools like WordPress and website builders are designed for non-technical users. If you can use email and Microsoft Word, you have enough technical skill to manage a basic website.
Q4: What is the best platform for beginners?
WordPress.org is widely considered the best platform because it balances ease of use with limitless growth potential. It powers everything from small blogs to major news outlets.
Q5: How do I make my website show up on Google?
You need to optimize your site for SEO (keywords, fast loading, high-quality content) and verify your site with Google Search Console. Consistency is key; it often takes 3–6 months to start seeing significant organic traffic.
Q6: Should I hire a developer or use WordPress?
For 90% of beginners, using WordPress yourself is the right choice. It is cheaper and empowers you to make changes on your own. You should only hire a developer if you need highly complex, custom functionality that plugins cannot provide.
Ready to Launch?
Building a website is a journey, but it is one of the most rewarding projects you can undertake. By following this checklist, you have moved from a blank screen to a fully functional, secure, and optimized website.
Don’t let perfectionism stop you. The internet is full of successful websites that started out imperfectly. The most important step is simply to start.
Download your free PDF version of this checklist below and start building your dream website today!